Client Download
The latest stable version of FileZilla Client is 3.3.2.1
Please select the file appropriate for your platform below.
Windows 
FileZilla_3.3.2.1_win32-setup.exe ![]() (recommended)
(recommended)
Size: 4169301 bytes
SHA-512 hash: 824bcdc7eff91ba4f0522ab72099897a8dfbd749ee9985301363ed2c26b48a2a25cd407122740141bbdac8e8d50644d001784b2910ef88cef6760b12e31fb8a6
Size: 6188989 bytes
SHA-512 hash: 54c455dce4381d6d6d8dd98f42fbfd61b30a3d4e76e0a671fe463b4222dab7ddbc6effdd414171352c378e2569c0049cd0afd217f1c4df4f3a9dedaa05cc0dd0
Windows XP, Vista and Windows 7 are supported
Linux 
FileZilla_3.3.2.1_i586-linux-gnu.tar.bz2 ![]()
Size: 4678247 bytes
SHA-512 hash: f6c2abd66f99b539b97e87ca0d241b451dc39bfb58b1782972e955f7891e21bf54c58ddc7c98d8e0c069acd81ff5b77f9853ff919a41d0b3f2f2a32124c0d743
FileZilla_3.3.2.1_x86_64-linux-gnu.tar.bz2 ![]()
Size: 5068294 bytes
SHA-512 hash: 773a9e694918ee8c2689ef5cb58a4810ba4dbb383f057a0fa7acfe2848e95c6fa28fe8d94875c1625679d5f23828db4ecb78f26e40d6594dcc40f81741902de2
Built for Debian 5.0 (Lenny). It is highly recommended to use the package management system of your distribution or to manually compile FileZilla if you are running a different flavour of Linux.
Mac OS X 
FileZilla_3.3.2.1_i686-apple-darwin9.app.tar.bz2 ![]() (Intel)
(Intel)
Size: 4920385 bytes
SHA-512 hash: 2b6359726c239e7ebbcc82cae7fcc34ed4acc4bf0b94fa5f1b1749861de8332872c60272562f63f221ab8148741f6ebc0f4f681c11e64a3772f7e913224f6e18
FileZilla_3.3.2.1_powerpc-apple-darwin9.app.tar.bz2 ![]() (PowerPC G4)
(PowerPC G4)
Connecting to an FTP server
Using the Quick Connect bar
To connect to an FTP server, enter the address of the server into the host field of the Quickconnect bar (i.e. domain.com - see image below). If it is a special server type like an SFTP server, add the protocol in front of the address. In case of an SFTP server, start the address with 'sftp://' (i.e. sftp://domain.com). Enter the port of the server into the port field if it is not the default port (21 for FTP, 22 for SFTP). If a username / password is required, enter it in the corresponding fields, otherwise the default anonymous logon will be used. Click on Quickconnect or press Enter to connect to the server.

Please notice that the Quick Connect is for... quick connections - so there is no way to edit the quick connections list which stores the last 10 entries. To store FTP server names you should use the Site Manager, instead.
Quick Connect is good for testing the login info before making a site manager entry. Once you connect, you can choose File -> "Copy current connection to Site Manager..." to make a permanent entry. It is usually best to check your login info with Quick Connect before making a permanent entry.
Using Site Manager
You can use the FileZilla Site Manager to specify specific site parameters and connect to the targeted FTP site. The Site Manager allows you to store entries and configure more parameters than the Quick Connect allows.
Special case: Servers in LAN
If the server you are connecting to is in your home LAN, then there is not an address (domain name) as you may know from the Internet. In LAN, you simply use the internal IP address of the server PC. In most cases the network name (computer name) will do, too. If the server is on the same PC as Filezilla, you can even use localhost or 127.0.0.1 as hostname.
NOTE: If you connect from the outside of your LAN this does not apply, you have to use the external (WAN) IP instead.
Navigating on the server
After a successful connection attempt, a list of files and folders appears on the right side of the main window. The current folder is listed in the edit field on the top. Below you will see the remote directory tree and below that, the contents of the current remote folder. There are three ways to change the folder. First, you can double-click a folder in the file list. Second, you can change the current folder by clicking a folder in the directory tree. Last but not least, you can always enter the folder name into the edit field and press enter. You will notice a folder called ".." displayed in virtually all directories. This folder allows you to go up to the parent directory of the current folder.

Navigating on your machine
Navigating on your machine works almost like navigating on the server. The current local folder and the local directory tree are displayed on the left side of the main window by default.

Synchronized Browsing
If you have an identical directory structure on the local machine and the server, you can enable synchronized browsing. This means that any directory navigation on one machine is duplicated on the other.
To enable synchronized browsing, create an entry in the Site Manager, and on the Advanced tab, ensure that the Default local directory and the Default remote directory have the same structure. Then check "use synchronized browsing," save your settings, and connect.
Directory Comparison
To quickly see differences between files on the local machine and the server, choose View > Directory Comparison, and choose either "compare file size" or "compare modification time." (You also hide identical files by checking that option.) Then choose "Enable."
You will now see color-coded differences between copies of the same file on the different machines. See their meanings here.
Transferring files
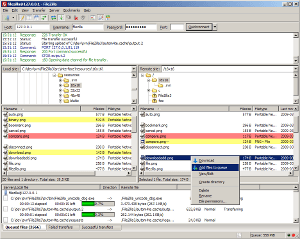
You can upload or download a file by double-clicking on it. It will be added to the transfer queue and the transfer starts automatically. To transfer folders and/or multiple files, select them and right-click the selection. Then you can click on Upload/Download in the popup menu.

You can also drag the files from one side and drop them on the other side. To add files to the queue so that they will be transferred later, select them and click Add to Queue from the popup menu. You may also drag the files directly into the queue. Click on the ![]() button on the toolbar to start the transfer.
button on the toolbar to start the transfer.
Or, you can click on a file, then drag the file (a box is added to the arrow cursor) to the folder where you want to move it. The folder will be highlighted when you are over it. Let go of the mouse button and the file will be moved to the folder.

